Linux users on Arch or Manjaro attempting to install macOS/OSX in VMWARE, or QEMU/KVM, will greatly benefit from this tutorial.
UPDATED 3rd July 2020
3 ways to run.
- Docker-OSX version: good to have a look, instantly run
- Virt-Manager: import macOS-libvirt-Catalina.xml script from the xml file in OSX-KVM
- OpenCore script ./OpenCore-Boot.sh
If you want to test it out, run my Docker-OSX project: https://github.com/sickcodes/Docker-OSX
SKIP ANY INSTRUCTIONS THAT ARE LIKE THIS
RELEASED: Dockerfile full auto macOS installer. Will be released May 28th 2020.
Mac OSX in a Docker Container released: https://github.com/sickcodes/Docker-OSX
This tutorial now covers:
MacOS VM on Arch, Ubuntu, Debian, CentOS, RHEL or Fedora.
Dockerfile available! Instant run docker-osx run:
# insta run on any OS
docker pull sickcodes/docker-osx
docker run --privileged -e "DISPLAY=${DISPLAY:-:0.0}" -v /tmp/.X11-unix:/tmp/.X11-unix sickcodes/docker-osx
Virt-Manager Local Installation with xml file.
Check if your CPU has virtualization. This out of the following command must be greater than 0.
It tells you how many cores can be used in virtualization. You might see 8, 12, 64.
# ALL DISTROS
# egrep -c '(svm|vmx)' /proc/cpuinfo
If you see 0 when you ran the above command, then boot into your BIOS and turn on “Hardware Virtualization.”
If you see 1, 2, 3 … any number greater than 0 then you can ready!
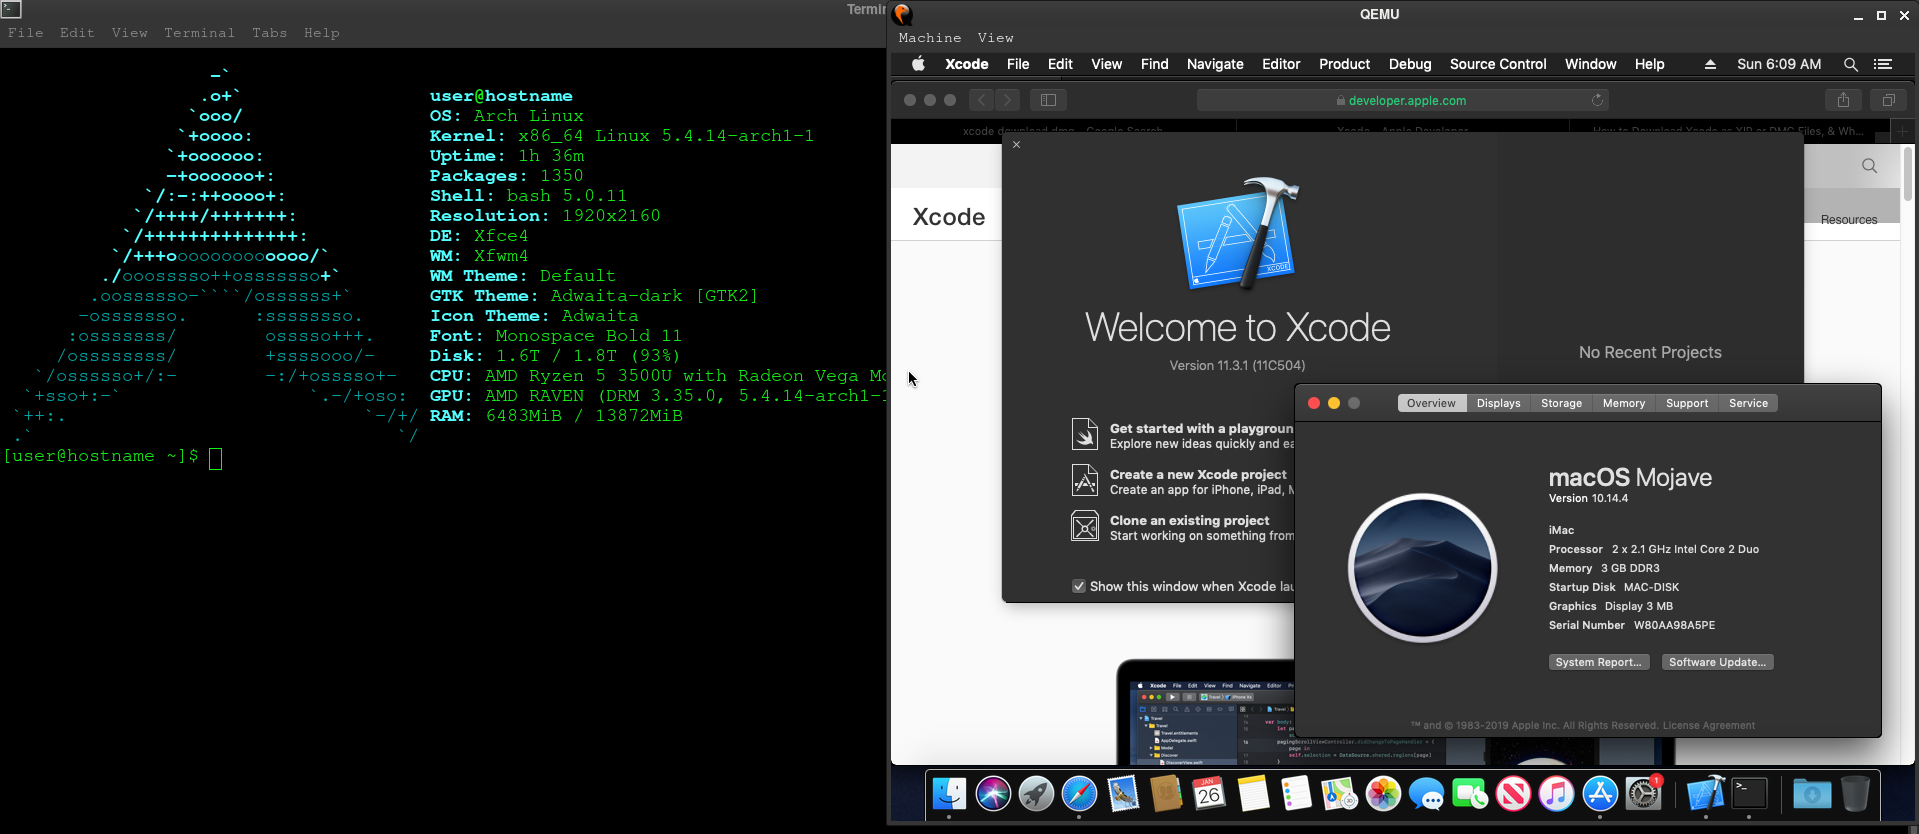
This tutorial is great for Linux users who want to use XCode 10 or 11 on Linux without Dual Booting!
How to Install macOS VM on Linux
Linux System Requirements:
- about 20-40gb of free space
- Intel VT-x / AMD SVM: in your BIOS turn on “hardware virtualization” or similar
Suggestions:
- highly recommend using an SSD
- where you download and run the scripts will determine which drive the OSX image will be created on
ARCH ONLY: an aur package manager, such as yay.
If you don’t have yay (Arch User Repository package manager):
ARCH LINUX USERS ONLY
pacman -S git make automake gcc python go autoconf cmake pkgconf alsa-utils fakeroot –noconfirm
git clone https://aur.archlinux.org/yay.git
cd yay
makepkg -si
Next, we will need git & python as we will need to clone some repositories.
# ARCH LINUX
sudo pacman -S git python

# UBUNTU DEBIAN
sudo apt install git python

# CENTOS RHEL FEDORA
sudo yum update -y
sudo yum install epel-release
sudo yum install git python -y
We are going to download the official the MAC iso/dmg file, which is around 6GB downloaded.
Make sure you download the iso in the disk or device that you are going to run the VM from.
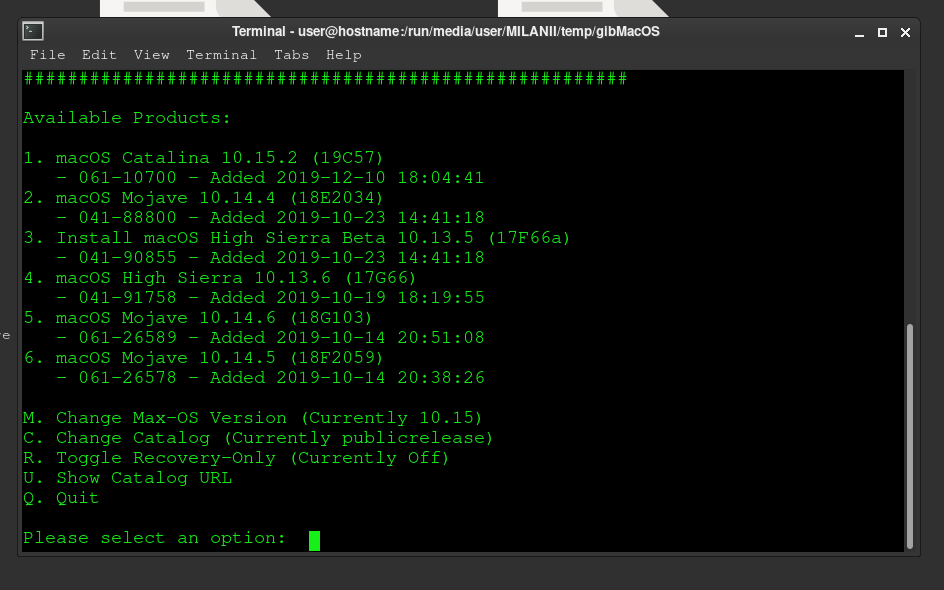
A great way to download OSX ISO files is using gibMacOS:
git clone https://github.com/corpnewt/gibMacOS.git
cd gibMacOS
chmod +x gibMacOS.command
./gibMacOS.command

# if this doesn't work
python gibMacOS.command
python2.7 gibMacOS.command
python2 gibMacOS.command
This will run a small Python script that will allow you to download the official Mac iso files from *.apple.com
The version that I run is Mojave 10.14.6.
macOS Mojave 10.14.6 (18G103)
Next, you will need qemu & libvirt for virtualisation and emulation.
Also required during qemu installation:
– dnsmasq for networking
– virt-manager
– bridge-utils for additional networking Requirements
# ARCH LINUX ONLY
sudo pacman -Syu qemu libvirt dnsmasq virt-manager bridge-utils flex bison ebtables edk2-ovmf netctl libvirt-dbus libguestfs

# UBUNTU DEBIAN
sudo apt install qemu qemu-kvm libvirt-clients libvirt-daemon-system bridge-utils virt-manager dnsmasq

# CENTOS RHEL FEDORA
sudo yum install libvirt qemu-kvm -y
Now, enable libvirt and virtlogd
- libvirt is libraries required for virtualisation
- virtlogd is logging of the qemu virtual instances
sudo systemctl enable libvirtd.service
sudo systemctl enable virtlogd.service
Additionally, you will require the following packages which are found only in the Arch User Repository.
Most of them are on Github if you want to compile them yourselves.
Installing these will take some time, so one-by-one install these:
# ARCH LINUX ONLY
# you may need the following
yay uml_utilities # read below if doesn’t install
yay libguestfs # libguestfs is in arch/comminuty-testing now too
yay ebtables
yay firewalld
sudo firewalld
Update May 2020: ARCH uml_utilities may need to be installed in the following way:
# ARCH ONLY
# the current version of uml_utilities may need to be installed in the following way
# because the pkgbuild has a tiny error, if it gets fixed, this snippet will still work fine with r
yay –getpkgbuild uml_utilities
cd uml_utilities
perl -i -p -e “s/provides=\(\’\’\)/provides=\(\)/g” PKGBUILD
perl -i -p -e “s/conflicts=\(\’\’\)/conflicts=\(\)/g” PKGBUILD
makepkg -si
If you are on Debian or Ubuntu
# DEBIAN UBUNTU
sudo apt install qemu qemu-kvm libvirt-clients libvirt-daemon-system bridge-utils virt-manager uml-utilities dmg2img wget libguestfs-tools
The following program qt-virt-manager is huge and takes a long time to compile but you might need it:
# yay qt-virt-manager
You should reboot now to apply kernel changes for qemu.
# reboot if you just installed kvm
sudo modprobe kvm
reboot
After reboot, download the OSX-KVM Repository:
This folder will be referred to as the OSX-KVM folder.
Your macOS disk will be created in the folder we are about to download into.
Make sure you choose a disk with enough space.
git clone https://github.com/kholia/OSX-KVM.git
cd OSX-KVM
# if you didnt use gibMacOS to download the OSX ISO you can use:
# ./fetch-macOS.py
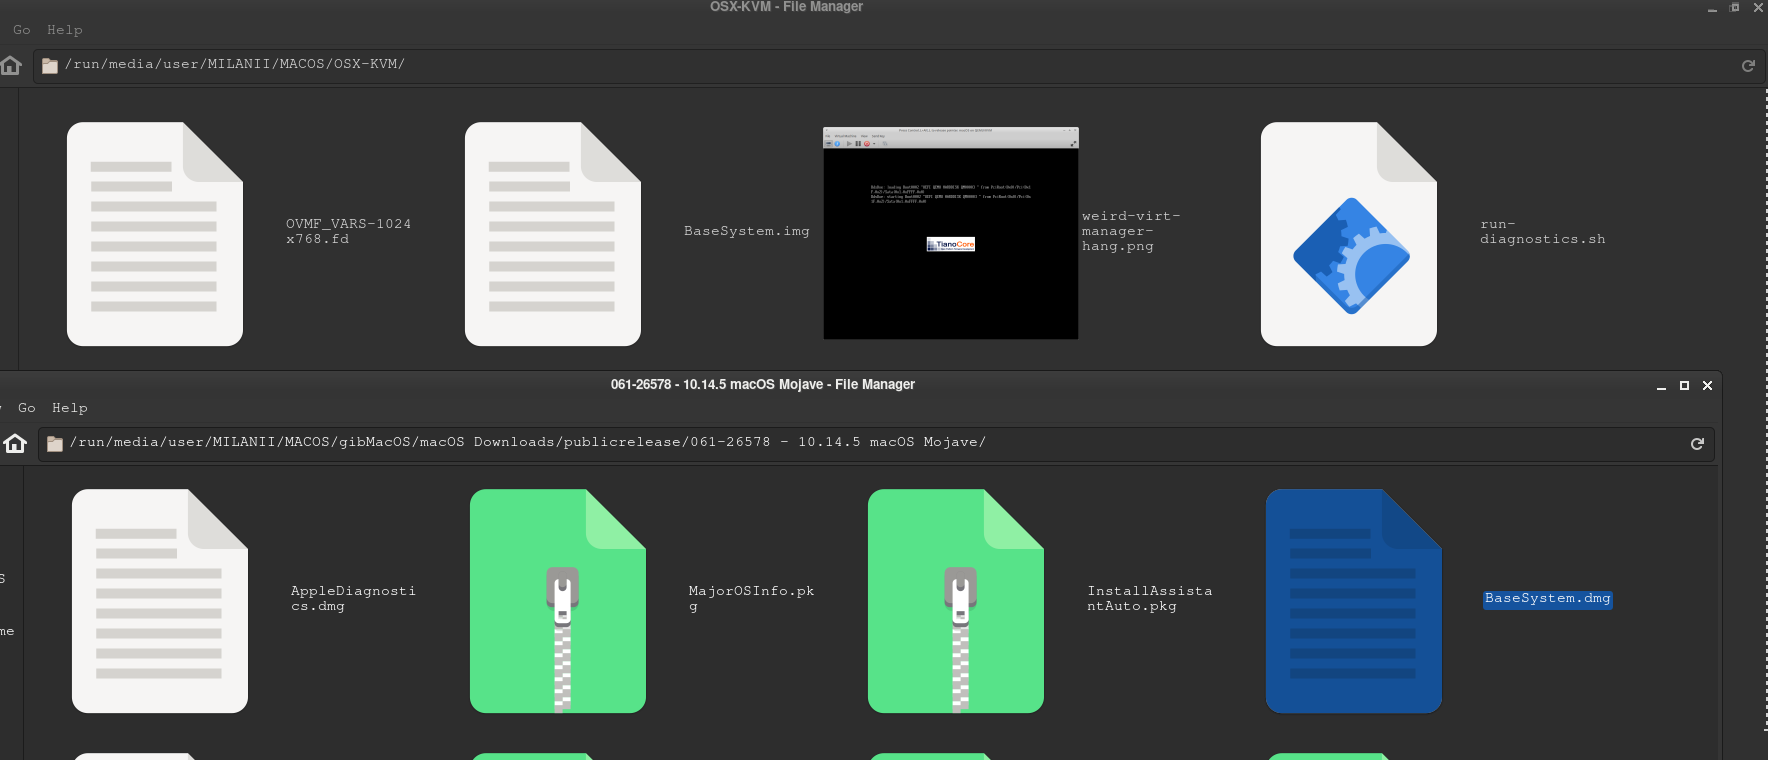
Converting macOS BaseSystem.dmg into Disk Image
In the gibMacOS folder that you downloaded earlier, navigate into:
macOS Downloads > publicrelease, and then the folder of the OSX Version that you downloaded.
Inside the macOS version folder that you downloaded from gibMacOS, we will turn the .dmg into .img
Make sure you have enough disk space here!
Find BaseSystem.dmg inside the gibMacOS downloaded folder. It should be around 500mb.
Convert it to .img:
# do this inside gibMacOS/macOS Downloads/publicrelease/061-26589 - 10.14.6 macOS Mojave/
qemu-img convert BaseSystem.dmg -O raw BaseSystem.img

# or do it inside any version auto
qemu-img convert gibMacOS/macOS\ Downloads/publicrelease/*/BaseSystem.dmg -O raw BaseSystem.img
Now move the BaseSystem.img that you just created FROM the gibMacOS folder -> TO THE OSX-KVM FOLDER
Decide now how big you want the macOS disk size to be.
I want an 80GB macOS disk size so I run the command below.
Note: do not change “mac_hdd_ng.img” or it will break the scripts later.
qemu-img create -f qcow2 mac_hdd_ng.img 80G
The 80GB empty disk has been created.
The macOS image is ready.
Now, create the network for the OSX VM
If you have successfully installed all the AUR packages above, you should be able to run this:
Run these commands one-by-one:
Update July 2020: Networking fix. Open OpenCore-Boot.sh
Replace the networking line in OpenCore-Boot.sh with the following:
-netdev user,id=net0, -device e1000-82545em,netdev=net0,id=net0,mac=52:54:00:09:49:17
If you want SSH access, using this (ssh -p 10922 user@localhost)
-netdev user,id=net0,hostfwd=tcp::10922-:22, -device e1000-82545em,netdev=net0,id=net0,mac=52:54:00:09:49:17
Update June 2020: Networking fix. Open OpenCore-Boot.sh
# Replace line 40 in OpenCore-Boot.sh
-netdev tap,id=net0,ifname=tap0,script=no,downscript=no -device vmxnet3,netdev=net0,id=net0,mac=52:54:00:c9:18:27 \
# with:
-netdev user,id=net0 -device vmxnet3,netdev=net0,id=net0,mac=52:54:00:09:49:17
perl -p -i -e \
‘s/-netdev tap,id=net0,ifname=tap0,script=no,downscript=no -device vmxnet3,netdev=net0,id=net0,mac=52:54:00:c9:18:27/-netdev user,id=net0 -device vmxnet3,netdev=net0,id=net0,mac=52:54:00:09:49:17/’ \
./OpenCore-Boot.sh
sudo ip tuntap add dev tap0 mode tap
sudo ip link set tap0 up promisc on
sleep 1
sudo virsh net-start default
sudo virsh net-autostart default
sudo ip link set dev virbr0 up
sleep 1
sudo ip link set dev tap0 master virbr0
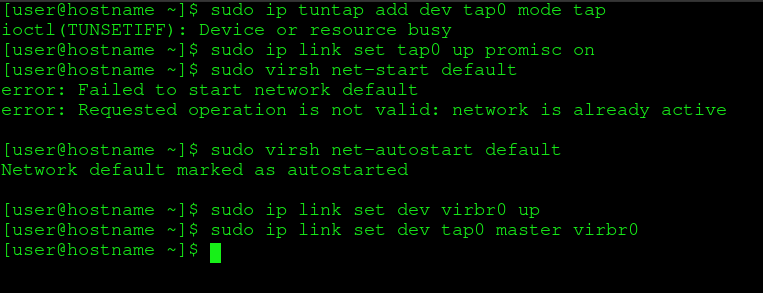
Mac is now ready to boot.
If everything looks okay, you are ready to boot macOS on Arch Linux.
If everything is not okay, leave a comment, I usualy reply within 24 hours. use imgur.com to link to image if you want to post a screenshot
Boot macOS
# new shell boot script version! As of May 2020
./OpenCore-Boot.sh
# old tutorial, may fail
./boot-macOS-NG.sh
Boot and Installation Process
Hint: in QEMU, press Ctrl + Alt + G to gain control of your mouse again.
At the CLOVER Boot Manager screen, select:
Boot macOS Install from macOS Base System
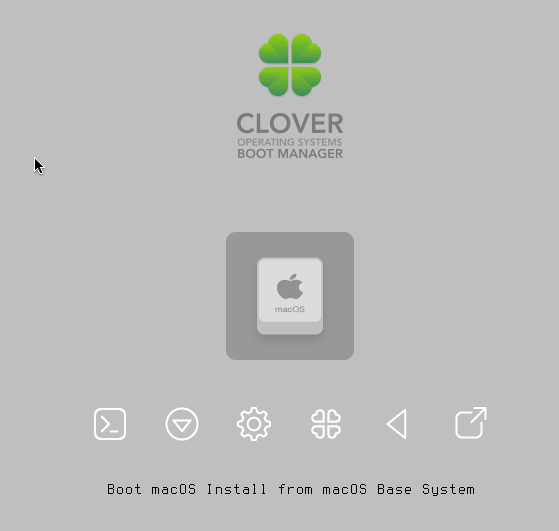
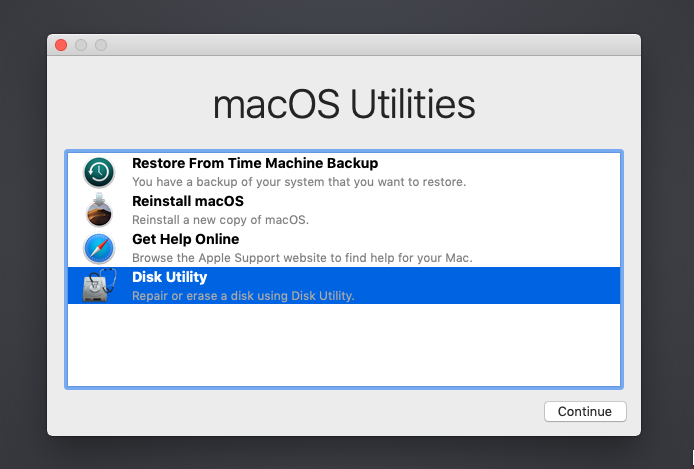
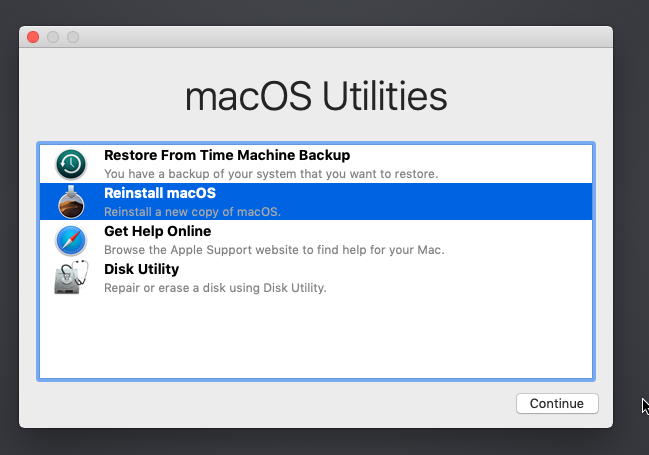
After about a minute, the macOS recovery GUI will appear and you can select your language.
When you reach the macOS Utilities screen, seleck “Disk Utility”
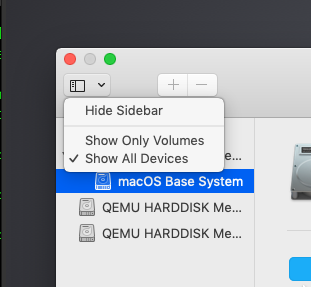
In the top left, select “Show All Devices”. Not required to see the disk we are using, but helpful to visualize what is happening
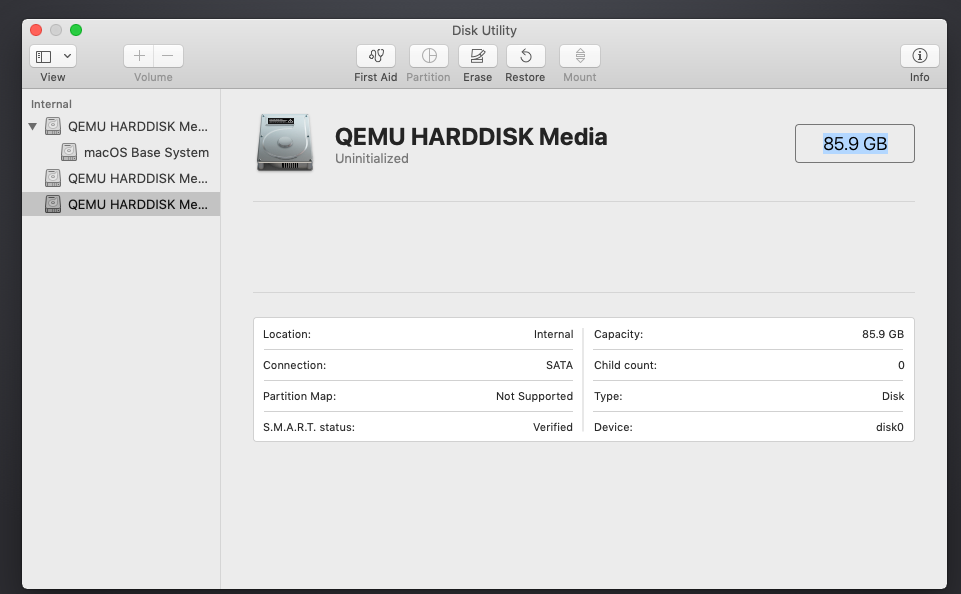
Select the disk which has 80GB and is “Uninitialized”.
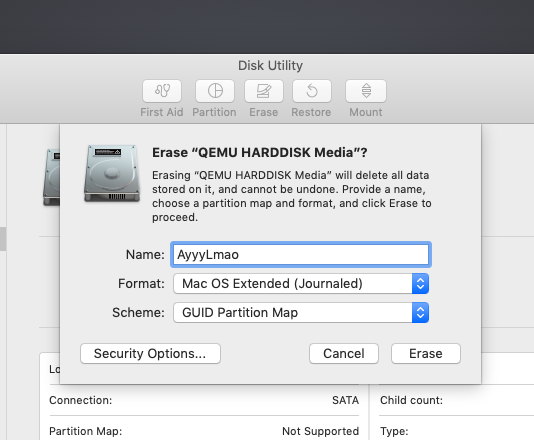
Click on “Erase” and erase the 90GB disk.
Do not change the Format or Scheme.
Erasing the disk here does nothing to your real computer. This is a virtual drive.
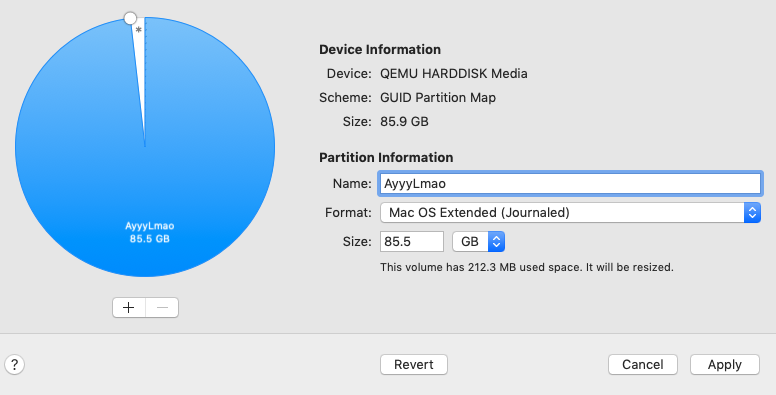
Create a new partition for macOS on your QEMU Drive
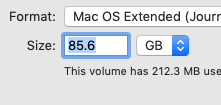
NOTE: YOU MUST REDUCE THE DISK SIZE BY A SMALL AMOUNT TO BE ABLE TO PRESS APPLY
After you have erased the disk, click “Partition”.
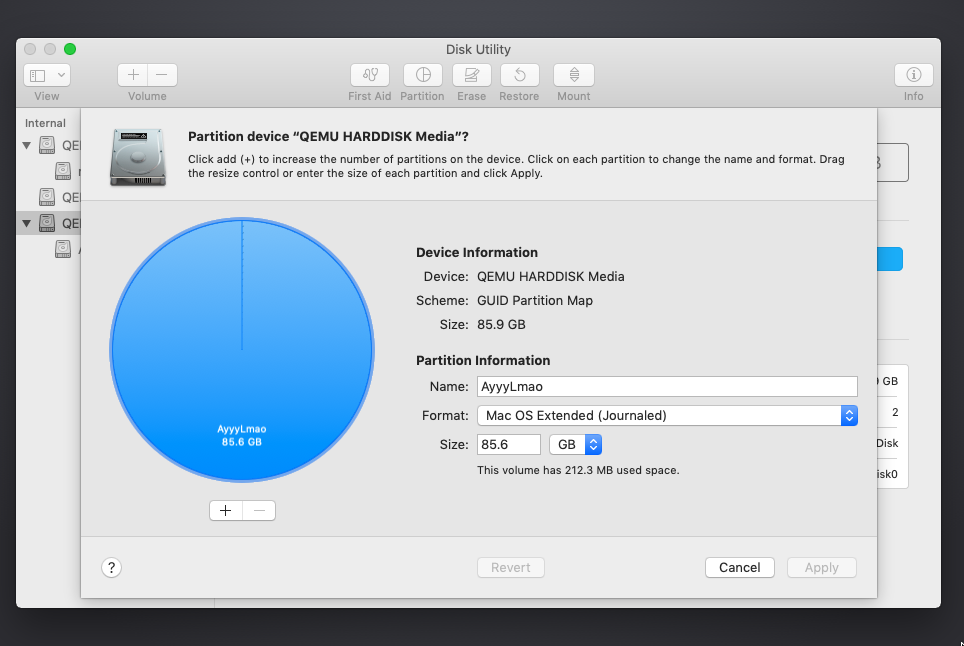
Change 85.6 to 85.5 and you will be able to press apply.
Note: this will NOT steal 80GB straight away from your hard drive: it’s just virtually allocating it from your host machine’s disk.
When that has finished, you can close the “Disk Utility”
Select Reinstall macOS.
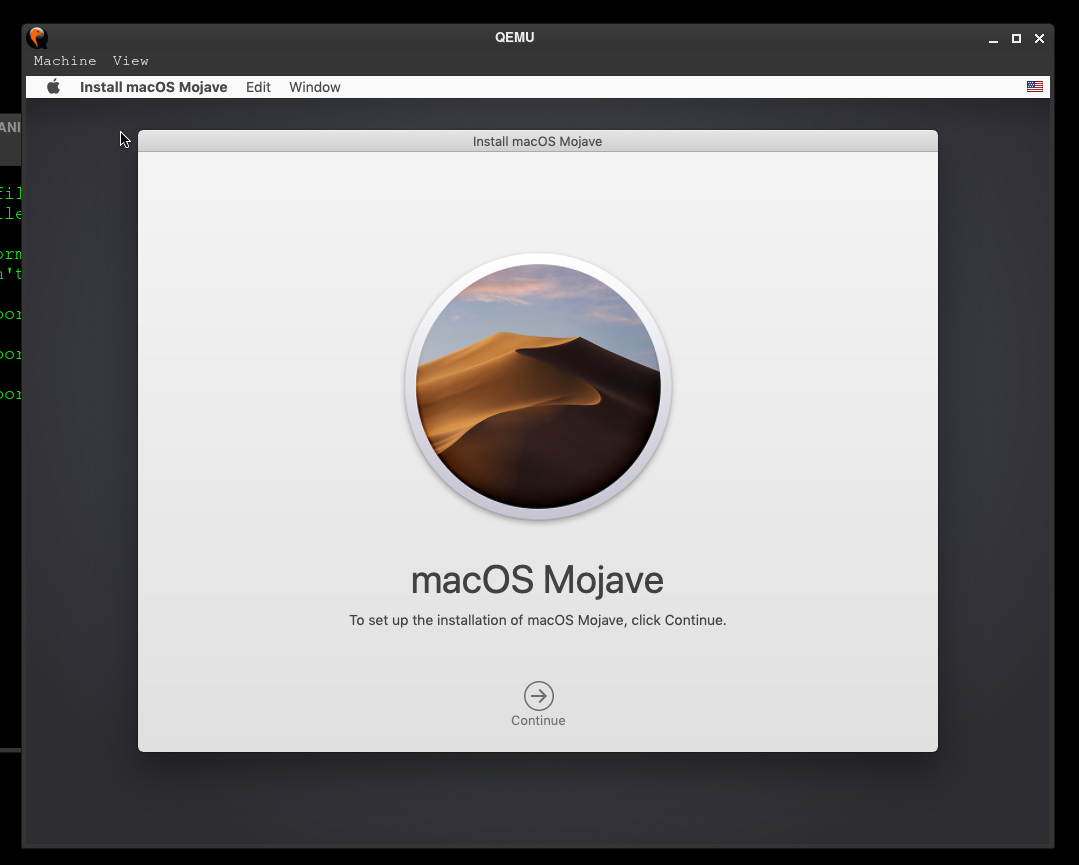
Have fun using macOS on Linux with QEMU!
Finsihed installing OSX on Linux in a VM!
Update May 2020 fixes for existing Mac OSX Virtual Machines:
virsh is now included in libvirtd.
Something happened to my tun setup but I documented the fix in this article about TUN/TAP OSX-KVM
You may need to remove the git version of virsh that we are using and use the one from libvirtd:
# Replace line 40 in OpenCore-Boot.sh -netdev tap,id=net0,ifname=tap0,script=no,downscript=no -device vmxnet3,netdev=net0,id=net0,mac=52:54:00:c9:18:27 \ # with: -netdev user,id=net0 -device vmxnet3,netdev=net0,id=net0,mac=52:54:00:09:49:17 # remove the existing networks created by the old package # dont worry, these will get created again when you reinstall qemu and libvirt #sudo pacman -R virsh sudo ip link delete virbr0 sudo ip link delete virbr0-nic sudo pacman -S libvirt qemu reboot
It seems we don’t need this command any more because the libvirt package includes virsh.
Remove any virsh commands from your boot scripts (the bonus one above).
# I removed these# sudo virsh net-create default # sudo virsh net-autostart default
qemu-system-x86_64: could not configure /dev/net/tun (tap0): Operation not permitted
You must turn on the bridge if you are using bridged networking.
sudo systemctl restart libvirtd.service
sudo systemctl restart virtlogd.service
sudo systemctl enable --now libvirtd.service
sudo systemctl enable --now virtlogd.service
sudo ip tuntap add dev tap0 mode tap
sudo ip link set tap0 up promisc on
sleep 1
sudo virsh net-start default
sudo virsh net-autostart default
sudo ip link set dev virbr0 up
sleep 1
sudo ip link set dev tap0 master virbr0

bash ./OpenCore-Boot.sh
Or
command “sudo virsh net-start default” hangs
This error happened when I updated the kernel.
Solved by reinstalling qemu and libvirt:
# Replace line 40 in OpenCore-Boot.sh -netdev tap,id=net0,ifname=tap0,script=no,downscript=no -device vmxnet3,netdev=net0,id=net0,mac=52:54:00:c9:18:27 \ # with: -netdev user,id=net0 -device vmxnet3,netdev=net0,id=net0,mac=52:54:00:09:49:17sudo pacman -R virsh sudo ip link delete virbr0 sudo ip link delete virbr0-nic sudo pacman -S libvirt qemu reboot
Then change the networking mode to Usermode. You can do that by importing the whole thing into virt-manager by using the file named macOS-libvirt-Catalina.xml. Happy to help with any questions you might have!
Increase Screen Resolution on MacOS Virtual Machine QEMU!
– Automatically fixed in the new OpenCore-Boot.sh version
– Use the new OpenCore-Boot version!
MY OSX-KVM LIBVIRT XML FILE
Has networking but no SSH to the guest (You can SSH from the guest to the host, just start sshd on Arch Linux via systemctl start sshd.service)
Change the absolute paths below (/home/user/OSX/OSX-KVM to your OSX-KVM folder.)
# copy the big wall of text below
# edit and save as osxkvm.xml
virsh define osxkvm.xml
# open virt-manager and run!
<domain xmlns:qemu="http://libvirt.org/schemas/domain/qemu/1.0" type="kvm">
  <name>macOS</name>
  <uuid>2aca0dd6-cec9-4717-9ab2-0b7b13d111c3</uuid>
  <title>macOS</title>
  <memory unit="KiB">4194304</memory>
  <currentMemory unit="KiB">4194304</currentMemory>
  <vcpu placement="static">4</vcpu>
  <os>
    <type arch="x86_64" machine="pc-q35-4.2">hvm</type>
    <loader readonly="yes" type="pflash">/home/user/OSX/OSX-KVM/OVMF_CODE.fd</loader>
    <nvram>/home/user/OSX/OSX-KVM/OVMF_VARS-1024x768.fd</nvram>
  </os>
  <features>
    <acpi/>
    <apic/>
  </features>
  <cpu mode="custom" match="exact" check="none">
    <model fallback="forbid">qemu64</model>
  </cpu>
  <clock offset="utc">
    <timer name="rtc" tickpolicy="catchup"/>
    <timer name="pit" tickpolicy="delay"/>
    <timer name="hpet" present="no"/>
  </clock>
  <on_poweroff>destroy</on_poweroff>
  <on_reboot>restart</on_reboot>
  <on_crash>destroy</on_crash>
  <devices>
    <emulator>/usr/bin/qemu-system-x86_64</emulator>
    <disk type="file" device="disk">
      <driver name="qemu" type="qcow2" cache="writeback" io="threads"/>
      <source file="/home/user/OSX/OSX-KVM/OpenCore-Catalina/OpenCore.qcow2"/>
      <target dev="sda" bus="sata"/>
      <boot order="2"/>
      <address type="drive" controller="0" bus="0" target="0" unit="0"/>
    </disk>
    <disk type="file" device="disk">
      <driver name="qemu" type="qcow2" cache="writeback" io="threads"/>
      <source file="/home/user/OSX/OSX-KVM/mac_hdd_ng.img"/>
      <target dev="sdb" bus="sata"/>
      <boot order="1"/>
      <address type="drive" controller="0" bus="0" target="0" unit="1"/>
    </disk>
    <controller type="sata" index="0">
      <address type="pci" domain="0x0000" bus="0x00" slot="0x1f" function="0x2"/>
    </controller>
    <controller type="pci" index="0" model="pcie-root"/>
    <controller type="pci" index="1" model="pcie-root-port">
      <model name="pcie-root-port"/>
      <target chassis="1" port="0x8"/>
      <address type="pci" domain="0x0000" bus="0x00" slot="0x01" function="0x0" multifunction="on"/>
    </controller>
    <controller type="pci" index="2" model="pcie-root-port">
      <model name="pcie-root-port"/>
      <target chassis="2" port="0x9"/>
      <address type="pci" domain="0x0000" bus="0x00" slot="0x01" function="0x1"/>
    </controller>
    <controller type="pci" index="3" model="pcie-root-port">
      <model name="pcie-root-port"/>
      <target chassis="3" port="0xa"/>
      <address type="pci" domain="0x0000" bus="0x00" slot="0x01" function="0x2"/>
    </controller>
    <controller type="pci" index="4" model="pcie-root-port">
      <model name="pcie-root-port"/>
      <target chassis="4" port="0xb"/>
      <address type="pci" domain="0x0000" bus="0x00" slot="0x01" function="0x3"/>
    </controller>
    <controller type="pci" index="5" model="pcie-root-port">
      <model name="pcie-root-port"/>
      <target chassis="5" port="0xc"/>
      <address type="pci" domain="0x0000" bus="0x00" slot="0x01" function="0x4"/>
    </controller>
    <controller type="pci" index="6" model="pcie-root-port">
      <model name="pcie-root-port"/>
      <target chassis="6" port="0xd"/>
      <address type="pci" domain="0x0000" bus="0x00" slot="0x01" function="0x5"/>
    </controller>
    <controller type="pci" index="7" model="pcie-root-port">
      <model name="pcie-root-port"/>
      <target chassis="7" port="0xe"/>
      <address type="pci" domain="0x0000" bus="0x00" slot="0x01" function="0x6"/>
    </controller>
    <controller type="pci" index="8" model="pcie-root-port">
      <model name="pcie-root-port"/>
      <target chassis="8" port="0xf"/>
      <address type="pci" domain="0x0000" bus="0x00" slot="0x01" function="0x7"/>
    </controller>
    <controller type="pci" index="9" model="pcie-to-pci-bridge">
      <model name="pcie-pci-bridge"/>
      <address type="pci" domain="0x0000" bus="0x01" slot="0x00" function="0x0"/>
    </controller>
    <controller type="virtio-serial" index="0">
      <address type="pci" domain="0x0000" bus="0x02" slot="0x00" function="0x0"/>
    </controller>
    <controller type="usb" index="0" model="ich9-ehci1">
      <address type="pci" domain="0x0000" bus="0x00" slot="0x07" function="0x7"/>
    </controller>
    <controller type="usb" index="0" model="ich9-uhci1">
      <master startport="0"/>
      <address type="pci" domain="0x0000" bus="0x00" slot="0x07" function="0x0" multifunction="on"/>
    </controller>
    <controller type="usb" index="0" model="ich9-uhci2">
      <master startport="2"/>
      <address type="pci" domain="0x0000" bus="0x00" slot="0x07" function="0x1"/>
    </controller>
    <controller type="usb" index="0" model="ich9-uhci3">
      <master startport="4"/>
      <address type="pci" domain="0x0000" bus="0x00" slot="0x07" function="0x2"/>
    </controller>
    <interface type="user">
      <mac address="52:54:00:92:d4:7b"/>
      <model type="e1000-82545em"/>
      <address type="pci" domain="0x0000" bus="0x00" slot="0x02" function="0x0"/>
    </interface>
    <serial type="pty">
      <target type="isa-serial" port="0">
        <model name="isa-serial"/>
      </target>
    </serial>
    <console type="pty">
      <target type="serial" port="0"/>
    </console>
    <channel type="unix">
      <target type="virtio" name="org.qemu.guest_agent.0"/>
      <address type="virtio-serial" controller="0" bus="0" port="1"/>
    </channel>
    <input type="tablet" bus="usb">
      <address type="usb" bus="0" port="1"/>
    </input>
    <input type="mouse" bus="ps2"/>
    <input type="keyboard" bus="usb">
      <address type="usb" bus="0" port="3"/>
    </input>
    <input type="keyboard" bus="ps2"/>
    <input type="tablet" bus="usb">
      <address type="usb" bus="0" port="2"/>
    </input>
    <graphics type="spice" autoport="yes">
      <listen type="address"/>
    </graphics>
    <video>
      <model type="cirrus" vram="16384" heads="1" primary="yes"/>
      <address type="pci" domain="0x0000" bus="0x09" slot="0x01" function="0x0"/>
    </video>
    <hostdev mode="subsystem" type="usb" managed="yes">
      <source>
      </source>
      <address type="usb" bus="0" port="4"/>
    </hostdev>
    <memballoon model="none"/>
  </devices>
  <qemu:commandline>
    <qemu:arg value="-device"/>
    <qemu:arg value="isa-applesmc,osk=ourhardworkbythesewordsguardedpleasedontsteal(c)AppleComputerInc"/>
    <qemu:arg value="-smbios"/>
    <qemu:arg value="type=2"/>
    <qemu:arg value="-cpu"/>
    <qemu:arg value="Penryn,kvm=on,vendor=GenuineIntel,+invtsc,vmware-cpuid-freq=on,+pcid,+ssse3,+sse4.2,+popcnt,+avx,+aes,+xsave,+xsaveopt,check"/>
  </qemu:commandline>
</domain>
Hello, Thanks for the nice tutorial! I have a question, I would be very happy if you answer. It works very well for a while after turning on the VM. But a little later, I get this error:
usb_desc_get_descriptor: 3 unknown type 33 (len 10)
usb_desc_get_descriptor: 2 unknown type 33 (len 10)
usb_desc_get_descriptor: 1 unknown type 33 (len 10)
And I cannot move the mouse cursor even though the VM is still running.
I researched for days but couldn’t find a solution. Thank you in advance!
Hi Admin,
Thanks for sharing , I have tried to deploy the same in eks(Amazon kubernettes) after changing the values in helm chart. helm deplyment completed sucessfully.Howeever, pod is keep-on crashing and getting the below error.
error screenshot is here:
### copy files to disk image
‘config.plist’ -> ‘/var/tmp/opencore-image-ng.sh-12/config.plist’
# mkdir /ESP/EFI
# mkdir /ESP/EFI/OC
# mkdir /ESP/EFI/OC/Kexts
# mkdir /ESP/EFI/OC/ACPI
# mkdir /ESP/EFI/OC/Resources
# mkdir /ESP/EFI/OC/Tools
# copy-in /var/tmp/opencore-image-ng.sh-12/EFI/BOOT /ESP/EFI
# copy-in /var/tmp/opencore-image-ng.sh-12/EFI/OC/OpenCore.efi /ESP/EFI/OC
# copy-in /var/tmp/opencore-image-ng.sh-12/EFI/OC/Drivers /ESP/EFI/OC/
# copy-in /var/tmp/opencore-image-ng.sh-12/EFI/OC/Kexts /ESP/EFI/OC/
# copy-in /var/tmp/opencore-image-ng.sh-12/EFI/OC/ACPI /ESP/EFI/OC/
# copy-in ./../resources/OcBinaryData/Resources /ESP/EFI/OC/
libguestfs: error: source ‘./../resources/OcBinaryData/Resources’ does not exist (or cannot be read)
### cleaning up …
~/OSX-KVM
mkdir: cannot create directory ‘/system_image’: Permission denied
mkdir: cannot create directory ‘/system_image’: Permission denied
Downloading 10.15.7 base image..
bash: line 27: python: command not found
Converting downloaded BaseSystem.dmg into BaseSystem10.15.7.img and saving in
qemu-img: Could not open ‘BaseSystem.dmg’: Could not open ‘BaseSystem.dmg’: No such file or directory
(0.00/100%)
Creating a 128G /system_image/server/mac_hdd_ng.img for system partition..
Formatting ‘/system_image/server/mac_hdd_ng.img’, fmt=qcow2 cluster_size=65536 extended_l2=off compression_type=zlib size=137438953472 lazy_refcounts=off refcount_bits=16
qemu-img: /system_image/server/mac_hdd_ng.img: Could not create ‘/system_image/server/mac_hdd_ng.img’: No such file or directory
Finished creating system partition!
_XSERVTransmkdir: Mode of /tmp/.X11-unix should be set to 1777
_XSERVTransmkdir: this may cause subsequent errors
_XSERVTransSocketCreateListener: failed to bind listener
_XSERVTransSocketUNIXCreateListener: …SocketCreateListener() failed
_XSERVTransMakeAllCOTSServerListeners: failed to create listener for unix
Xvnc TigerVNC 1.11.0 – built 2021-09-20 18:41
Copyright (C) 1999-2020 TigerVNC Team and many others (see README.rst)
See https://www.tigervnc.org for information on TigerVNC.
Underlying X server release 12011000, The X.Org Foundation
Tue May 10 10:24:57 2022
vncext: VNC extension running!
vncext: Listening for VNC connections on all interface(s), port 5999
vncext: created VNC server for screen 0
Starting QEMU..
qemu-system-x86_64: -drive id=MacHDD,if=none,file=/system_image/server/mac_hdd_ng.img,format=qcow2: Could not open ‘/system_image/server/mac_hdd_ng.img’: No such file or directory
can you please advise
Regards,
Prem
Howdy! I just tried this tutorial but with Big Sur, but it didn’t work.
$ ./OpenCore-Boot.sh
Could not access KVM kernel module: No such file or directory
qemu-system-x86_64: failed to initialize kvm: No such file or directory
this is what happened. Can you assist?
Hello,
Thanks for the tutorial! I am new in Linux but I managed to go up to the end and everything seems to work until I clock on continue in the Mojave installation window … I get the message “The recovery server could not be contacted.
(by the way the commands:
# Replace line 40 in OpenCore-Boot.sh
-netdev tap,id=net0,ifname=tap0,script=no,downscript=no -device vmxnet3,netdev=net0,id=net0,mac=52:54:00:c9:18:27 \
# with:
-netdev user,id=net0 -device vmxnet3,netdev=net0,id=net0,mac=52:54:00:09:49:17
didn’t work for me in Fedora.. As I am newby I don’t know if this could be related with my issues with Mojave installation… )
Do you have any ideas?
Thanks in advance!
when i run ./OpenCore-Boot.sh I’m getting this error
qemu-system-x86_64: Property ‘.kvm’ not found
Can you please help me here
While the above tutorial is detailed it is confusing to the average non technical reader. Also some of them are just outright outdated.
I stumbled across a great guide which allowed me to install macOS Big Sur on my Linux machine pretty easy. I can be found here https://youtu.be/c30RLycIpVY
As Steve would say, “It just works!!!”
Good point, I should update it!
Hi, thanks for great project!
I have problem with iPhone USB passthrough. Once I add device to qemu than it is added for a very short while and it is unplugged from quest. What can be the cause?
I tried:
a) in qemu console “device_add usb-host,hostbus=1,hostport=1”
– devUbuntu 20.04.2 LTSice is repeatedly connected from host to quest, from guest to host after a second
b) in Virtual Machine Manager add Hardware and USB
– device is connected to VM when OSx is booting and then it is unplugged from VM permanently
Do you have any idea what is the cause?
I have Ubuntu 20.04.2 LTS
Thanks a lot!
Hello,
if I start “OpenCore-Boot.sh” I get the following mistake
Attempting System Restart
Can you help me??
Kind regards,
Gerch Strunzenolwin
Great tutorial. Is it safe to use it? I mean legally? Other than that i only encountered one error. The following. I am able to run it only if i restart my manjaro. Can you tell me what is it? Great job guys!!!
(qemu:17): Gdk-ERROR **: 21:04:15.109: The program ‘qemu’ received an X Window System error.
This probably reflects a bug in the program.
The error was ‘BadAccess (attempt to access private resource denied)’.
(Details: serial 213 error_code 10 request_code 130 (MIT-SHM) minor_code 1)
(Note to programmers: normally, X errors are reported asynchronously;
that is, you will receive the error a while after causing it.
To debug your program, run it with the GDK_SYNCHRONIZE environment
variable to change this behavior. You can then get a meaningful
backtrace from your debugger if you break on the gdk_x_error() function.)
/bin/bash: line 1: 17 Trace/breakpoint trap (core dumped) /bin/bash -c ./Launch.sh
I really liked this tutorial. Got it working perfectly but when I added it to the Virtual Machine manager (so that I could manage my resources) It didn’t work. I added the mac_hdd_ng.img as the virtual hard drive but I get this error
https://imgur.com/dD3DF4c
It would do a lot of help if you could help me. I’m ever grateful to you.
Thanks For Such a detailed tutorial!
Nice tutorial, but I got this error:
https://imgur.com/a/k82sXNk
I’m using this specs:
OS: Manjaro Linux x86_64
Kernel: 5.9.16-1-MANJARO
Shell: zsh 5.8
Resolution: 1920×1080
DE: GNOME 3.38.3
WM: Mutter
Terminal: gnome-terminal
CPU: AMD Athlon II X4 640 (4) @ 3.014GHz
GPU: NVIDIA GeForce GT 710
Memory: 1935MiB / 7960MiB
Help.
# OS related issued, please help us identify the issue by posting the output of this

uname -a \

; echo 1 | sudo tee /sys/module/kvm/parameters/ignore_msrs \

; grep NAME /etc/os-release \

; df -h . \

; qemu-system-x86_64 --version \

; libvirtd --version \

; free -mh \

; nproc \

; egrep -c '(svm|vmx)' /proc/cpuinfo \

; ls -lha /dev/kvm \

; ls -lha /tmp/.X11-unix/ \

; ps aux | grep dockerd \

; docker ps | grep osx \

; grep "docker\|kvm\|virt" /etc/group
Complete noob here. Can you run ios emulator with xcode on this?
Sure can!
Complete noob here. Can you run ios emulator with xcode on this? Thanks.
Yes!
I have a quick question. I am running catalina through the docker-osx. Is there a way to change the memory or video memory?
There is a small change to access 10Mb of vram
https://github.com/kholia/OSX-KVM/blob/fabf039e00b25c643e2cf8dd1742ade73c4a9e37/OpenCore-Boot-CD.sh#L55
However, I found it made my desktop slower (try click + drag selection on the desktop you’ll see what I mean.)
Very good. Thanks a lot.
I am having a few problems
$ ./OpenCore-Boot.sh
Unable to init server: Could not connect: Connection refused
QEMU 3.1.0 monitor – type ‘help’ for more information
(qemu) pulseaudio: pa_context_connect() failed
pulseaudio: Reason: Connection refused
pulseaudio: Failed to initialize PA contextaudio: Could not init `pa’ audio driver
ALSA lib confmisc.c:767:(parse_card) cannot find card ‘0’
ALSA lib conf.c:4568:(_snd_config_evaluate) function snd_func_card_driver returned error: No such file or directory
ALSA lib confmisc.c:392:(snd_func_concat) error evaluating strings
ALSA lib conf.c:4568:(_snd_config_evaluate) function snd_func_concat returned error: No such file or directory
ALSA lib confmisc.c:1246:(snd_func_refer) error evaluating name
ALSA lib conf.c:4568:(_snd_config_evaluate) function snd_func_refer returned error: No such file or directory
ALSA lib conf.c:5047:(snd_config_expand) Evaluate error: No such file or directory
ALSA lib pcm.c:2565:(snd_pcm_open_noupdate) Unknown PCM default
alsa: Could not initialize DAC
alsa: Failed to open `default’:
alsa: Reason: No such file or directory
audio: Failed to create voice `dac’
ALSA lib confmisc.c:767:(parse_card) cannot find card ‘0’
ALSA lib conf.c:4568:(_snd_config_evaluate) function snd_func_card_driver returned error: No such file or directory
ALSA lib confmisc.c:392:(snd_func_concat) error evaluating strings
ALSA lib conf.c:4568:(_snd_config_evaluate) function snd_func_concat returned error: No such file or directory
ALSA lib confmisc.c:1246:(snd_func_refer) error evaluating name
ALSA lib conf.c:4568:(_snd_config_evaluate) function snd_func_refer returned error: No such file or directory
ALSA lib conf.c:5047:(snd_config_expand) Evaluate error: No such file or directory
ALSA lib pcm.c:2565:(snd_pcm_open_noupdate) Unknown PCM default
alsa: Could not initialize ADC
alsa: Failed to open `default’:
alsa: Reason: No such file or directory
audio: Failed to create voice `adc’
gtk initialization failed
See response here: https://github.com/sickcodes/Docker-OSX/issues/115#issuecomment-752174387
I’m using it on a laptop i7 8750H and 16gb ram, ubuntu 20.04. I config with 4core and 8gb ram in OpenCore-Boot.sh file, but macOS is seemed a bit slow. I think animation I move the mouse slower for the mouse in my ubuntu os. How to speed up macOS?
Hey there, yeah the animation is slow, it’s the display driver and currently there’s no known way to increase this speed. Once it’s released, or fixed, we will update this and the Docker to reflect that
I’m using it on a laptop i7 8750H and 16gb ram, ubuntu 20.04. I config with 4core and 8gb ram in OpenCore-Boot.sh file, but macOS is seemed a bit slow. I think animation I move the mouse slower for the mouse in my ubuntu os. How to speed up macOS?
This is very nice tutorial. I got it working. I have some special need .I like to run docker desktop inside mac osx.
But as you expect, docker won’t start. I tried to enable nested virtualization with qemu script but did not get it.
Can you show me how I can get docker working inside mac osx?
I don’t think you can get Docker working inside the OSX-KVM because I don’t believe we can do nested virt inside OSX-KVM yet.
You can run the Docker container outside of course.
Great tutorial, thanks!
Could you please say if it possible to pass hardware virtualization into virtual machine using qemu? I mean for things like running android emulator inside macos, for example.
You can use the Android emulator outside of MacOS 🙂 I am unaware of hardware nesting inside of the OSX guest currently.
Hello, I am having a few problems, first off i get this when putting in the last part just before the clover boot.sudo ./OpenCore-Boot.sh
QEMU 5.1.0 monitor – type ‘help’ for more information
(qemu) ALSA lib pcm_dmix.c:1090:(snd_pcm_dmix_open) unable to open slave
alsa: Could not initialize DAC
alsa: Failed to open `default’:
alsa: Reason: No such file or directory
ALSA lib pcm_dmix.c:1090:(snd_pcm_dmix_open) unable to open slave
alsa: Could not initialize DAC
alsa: Failed to open `default’:
alsa: Reason: No such file or directory
audio: Failed to create voice `dac’
ALSA lib pcm_dsnoop.c:642:(snd_pcm_dsnoop_open) unable to open slave
alsa: Could not initialize ADC
alsa: Failed to open `default’:
alsa: Reason: No such file or directory
ALSA lib pcm_dsnoop.c:642:(snd_pcm_dsnoop_open) unable to open slave
alsa: Could not initialize ADC
alsa: Failed to open `default’:
alsa: Reason: No such file or directory
audio: Failed to create voice `adc’
The qemu opens and I get
OCB: System has no boot entries
OC: failed to show boot menu
waiting on critical error
Thanks
Avoid using sudo, you shouldn’t have to, I’m checking the current status of OSX-KVM now
I‘m getting exactly the same error without using sudo
Hello. Many THX
2 ideas:
1.: On step “Next, you will need qemu & libvirt for virtualisation and emulation.”
Arch Linux has a pacman option: only install if needed.
The new command tested on my manjaro linux: sudo pacman -Syu –needed qemu libvirt dnsmasq virt-manager bridge-utils flex bison ebtables edk2-ovmf netctl libvirt-dbus libguestfs
2.: give the steps in this howto numbers please 🙂 it is easier to navigate
Ciao
P.S. it works! Thx 🙂
Thanks! Will do! Yes it’s a bit complicated to navigate.
Hi thanks for this tutorial I’ve got everything working great, CPU ram all setup although I can’t seem to get dual monitors working. I’ve tried adding a new video qxl card with standard cofigs then with both new and old with half vram and ram options. This didn’t work although with this when I virt-viewer spice localhost port it’ll close the libvert window open virt-viewer window. If I select view displays I now see display 1 with a tick and display 2 is new but greyed out. A post in the GitHub repo stays to switch macos to std type but no further explanation or where or how to do it. I don’t suppose you would know how to do it. The YouTube video on dual monitor doesn’t help either
Everything seems to working good
The only issue i have is my mouse goes to the bottom left corner and i cant move?
im not sure how to fix this.
Can you please help me
Sounds like it’s freezing. Change usb mouse to usb tablet in the launch script
Really cool. My only concern is that 7mb graphics
Yeah the graphics are slow as heck, if there’s any upstream changes to the graphics, I will update everyone immediately!
Hi,
thank you so much for ur awesome tutorial. However i am having an issue i can’t see any Sound Output Devices in macOS. Did I do something wrong or is this a known problem?
I am running Fedora 32.
Again thanks for the tutorial!!
Cheers
No problem 🙂
Yes, there is known sound problems.
– You can buy a USB sound card and passthru the USB device.
– Perhaps create a software sound card interface using ASIO4ALL or Audacity or something and pass it thru
In the Docker version we have, there are some sound notes:
“PulseAudio for sound (note neither AppleALC and varying alcid or VoodooHDA-OC have codec support though IORegistryExplorer does show the controller component working)”
https://github.com/sickcodes/Docker-OSX#troubleshooting
–
great guide! prior to this, i attempted OSX KVM using another guide and at that time clover was still used. i was using debian at that time. it took me days to get it to install! (still installing now).
but with your guide, i was already installing within minutes. i also have no background with manjaro (arch based) so i just followed your guide effortlessly.
have you tried GPU and PCI passthrough? i want to be able to give it a go. boot manjaro from iGPU and then passthrough my RX5500 XT and my broadcom wifi+bluetooth card. i’m looking forward to a guide from you 😀 (yeah, my hackintosh is working just fine)
i’m a long time hackintosh user but i’ve been wanting to explore kvm.
I have got it working, I’ll update the guide shortly
Hi, you haven’t updated the guide in regards to passthrough with GPUs, do you still plan on doing this?
Hey Dan, I haven’t been able to achieve GPU passthrough. I have only iGPU’s.
A USB GPU would work, you can join the discussion here:
https://github.com/sickcodes/Docker-OSX/issues/45
And
https://github.com/sickcodes/Docker-OSX/issues/20
i cant increase graphic memory . please help me
ok i will have a try thanks!
hi mate i am stuck on this error when i run ./opencore-boot.sh
qemu-system-x86_64: could not configure /dev/net/tun (tap0): Operation not permitted
i am running manjaro linux
Did you make the changes from bridge to usermode networking?
https://github.com/sickcodes/Docker-OSX/issues/72
I have a shell script ./boot-osx.sh
good stuff man worked right out the gate. Much faster and easier then the other methods.
Hello i get this very error message after i’ve connected “qemu” with the virt-manager.
That happen when i’m launching the said macOS VM:
=== START
unable to find any master var store for loader: /home/mf/OSX-KVM/OVMF_CODE.fd
Traceback (most recent call last):
File “/usr/share/virt-manager/virtManager/asyncjob.py”, line 75, in cb_wrapper
callback(asyncjob, *args, **kwargs)
File “/usr/share/virt-manager/virtManager/asyncjob.py”, line 111, in tmpcb
callback(*args, **kwargs)
File “/usr/share/virt-manager/virtManager/object/libvirtobject.py”, line 66, in newfn
ret = fn(self, *args, **kwargs)
File “/usr/share/virt-manager/virtManager/object/domain.py”, line 1279, in startup
self._backend.create()
File “/usr/lib/python3.8/site-packages/libvirt.py”, line 1234, in create
if ret == -1: raise libvirtError (‘virDomainCreate() failed’, dom=self)
libvirt.libvirtError: opération échouée : unable to find any master var store for loader: /home/mf/OSX-KVM/OVMF_CODE.fd
=== END
Edit OpenCore-Boot.sh and change the OVMF URL path from ./backup to ./
and this error
libusb: error [_open_sysfs_attr] open /sys/bus/usb/devices/3-6/bConfigurationValue failed ret=-1 errno=2
Use virt-manager and you can dynamically insert and remove USB devices, including while the machine is on, with a gui.
I ge this error
usb_desc_get_descriptor: 2 unknown type 33 (len 10)
when using the solution with the vendor and product id and i get this error
libusb_set_configuration: -6 [BUSY]
when i try to use the bus and port
Hi, how can i get the VM to recognize my device via usb. I already added the line
-usb -device usb-host,hostbus=1,hostaddr=6
but its still not showing
I followed this and cant run an iphone simulator because i dont have enough physical space. How can i expand the storage of the VM without screwing things up?
Upgrade the RAM by changing the value in the OpenCore-Boot.sh
May I know what should be added to the XML so as to share a folder between host and guest? And, how to specify a screen resolution for the guest OS? I am using QEMU version now (not Docker). Thanks.
May I know what should be added to the XML so as to share a folder between host and guest? And, how to specify a screen resolution for the guest OS? I am using QEMU version now (not Docker). Thanks.
Is it possible to mount a shared folder (e.g. via Docker volume)?
Yes, but you also have to add it via the qemu command line.
I have uploaded my XML file. You can import directly into virt-manager using virsh define
Hi,
I got as far as running OpenCore-Boot.sh but it fails with:
# ./OpenCore-Boot.sh
(process:30368): GLib-WARNING **: 16:55:59.340: gmem.c:489: custom memory allocation vtable not supported
qemu-system-x86_64: -smbios type=2: Don’t know how to build fields for SMBIOS type 2
I’ve got plenty of disk (652G spare where I’m installing the VM).
I’m installing this on a CentO server:
CentOS Linux release 7.7.1908 (Core)
Any thoughts?
I’m not 100% sure about this error. Can you try the Docker version and see if it runs?
Is uml-utilities required for Arch install?
Keep getting the same error when trying to open ./OpenCore-Boot.sh
Unable to init server: Could not connect: Connection Refused
gtk initialization failed
It’s no longer required, see the Docker-OSX Dockerfile for the most up to date instructions. Updating this now.
Hi, after following all the tutorial, I get this error message.
Could you help ? I’m a bit lost.
/OSX-KVM# ./boot-macOS-NG.sh
Unable to init server: Could not connect: Connection refused
qemu-system-x86_64: -drive if=pflash,format=raw,file=./backup/OVMF_VARS-1024×768.fd: Could not open ‘./backup/OVMF_VARS-1024×768.fd’: No such file or directory
Open ./boot-macOS-NG.sh and change the
./backupto./However, run the Opencore script instead
when running the diagnostic script it says everything is okay except that interface virbr0 doesnt seem to exist.
ive done everything in the guide to a tea and i dont know why it wont work?
Replace the networking line in OpenCore-Boot.sh with the following:
If you want SSH access, using this (ssh -p 10922 user@localhost)
Additional hints here: https://github.com/sickcodes/Docker-OSX/blob/master/Dockerfile
Awesome thank you !
➜ OSX-KVM git:(master) ✗ ./run-diagnostics.sh
== Distro Info ==
LSB Version: n/a
Distributor ID: ManjaroLinux
Description: Manjaro Linux
Release: 20.0.3
Codename: Lysia
\n== Loaded Modules ==
kvm_amd 114688 0
kvm 839680 1 kvm_amd
irqbypass 16384 1 kvm
ccp 118784 1 kvm_amd
\nAttention: /sys/module/kvm/parameters/ignore_msrs setting seems to be incorrect!
\n== Installed Binaries ==
QEMU emulator version 5.0.0
Copyright (c) 2003-2020 Fabrice Bellard and the QEMU Project developers
virt-manager version 2.2.1
Python 3.8.3
pip 20.0.2 from /usr/lib/python3.8/site-packages/pip (python 3.8)
\n== Networking ==\n
Interface virbr0 doesn’t seem to exist. Check your networking configuration.
Hi, how to resolve the problem. I’m new in KVM.
How can I convert the edited OpenCore-Boot.sh into valid xml to virsh manager?
There is already one in the folder called macOS-libvirt-Catalina.xml
Copy our networking lines though from the tutorial. Or you can use the Dockerfile version
I will turn the dockerfile version into virt-manager soon
when i boot it, the mouse doesnt move on the qemu scree, but i am moving it. i cant select anything, why?
nevermind i think i fixed it
Just need to use the keyboard keys for that part. Replying publicly to help anyone else who has the same question 🙂
Hello there! Works well thanks.
Could it work to emulate macOS with QEMU directly on a macOS Host?
Or somehow reuse the disk image on a mac host?
I’m looking into it. All progress made on https://github.com/sickcodes/Docker-OSX will be added back into this tutorial 🙂
Successful one-time installation.
How to configure network bridging?
And
Virtual machine mouse and host are out of sync.
Replace the -net and -net lines with the following:
-netdev user,id=net0,hostfwd=tcp::50922-:22-device e1000-82545em,netdev=net0,id=net0,mac=52:54:00:09:49:17
This is usermode networking. Bridge stopped working for me.
Hello !
How to attach a USB device to the virtual machine through the host ?
I just found a solution !
We have to edit the file
/home/user/OSX-KVM/OpenCore-Boot.sh
Add this line :
-device usb-ehci,id=ehci -device usb-host,bus=ehci.0,vendorid=0x8888,productid=0x8888 \
Make sure there is no empty lines in this file.
The vendor id and the product id in this example are not real. To find out yours, use this command in the terminal :
lsusb
You might need to change the permission of the file representing to your usb device like that :
sudo chmod 777 /dev/bus/usb/xxx/yyy
lsusb
Bus 001 Device 006: ID 05ac:12a8 Apple, Inc. iPhone5/5C/5S/6
# Add to the qemu.sh file
-usb -device usb-host,hostbus=1,hostaddr=6
Still can”t get it to recognise the iPhone as an iPhone though, did you get it working?
Hi! I can’t find where the qemu.sh file is located. I’ve searched a lot through Google but can’t find it. I got to boot Mac OS and it is usable, but I can’t get to use a USB drive since I can’t find the qemu.sh file to add the info you posted. Could you help me, please? Thanks in advance.
Use virt-manager with the xml and u can add usb devices
Or press enter in the temrinal and you can use qemu commands to add the device
How can I increase the Graphics/Video memory from 7mb to say 256mb?
Hey Richard, you can try looking through notes.md inside the OSX-KVM folder. It also depends on whether you have a Nvidia or AMD Graphics card. I haven’t been able to accelerate the graphics.
There’s also another file called macOS-libvirt-Catalina.xml, which you can import into virt-manager and run the system in virt-manager.
I haven’t tried tinkering too much with the video settings, I will try some stuff this weekend.
Hi there, I just updated the install and did get Qemu to launch with the update to the script, but after i select the “install macOS from recovery” it is just hangning at the next screen, looks like some kind of log screen. Can I post a pic on here?
Hey man! try booting with ./OpenCore-Boot.sh
It’s the new way better boot method.
Post the pic on imgur and then paste the link here
Try launching it with the OpenCore-Boot.sh script now. I have updated the tutorial. I also had some networking issues.
If you can’t get it working, let me know I’ll post the .xml version I am using with virt-manager now instead.
Yes that seemed work. Installing the OS now! thanks. I will update when i am in and launched into the desktop.
Thank YOU again!
You’re welcome dude, enjoy!!
Hi, thanks very much for the tutorial! I had two issues, the first one with the following command:
yay virsh
Doesn’t seem to work for me.
Then I continued with the rest of the process, have completed all steps except the one mentioned above. When I try to boot MacOS using the following command:
./boot-macOS-NG.sh
I get the following error message (the first part is obviously the terminal prompt):
[kostas@lynx OSX-KVM]$ ./boot-macOS-NG.sh
qemu-system-x86_64: -drive if=pflash,format=raw,file=./backup/OVMF_VARS-1024×768.fd: Could not open ‘./backup/OVMF_VARS-1024×768.fd’: No such file or directory
When I check the contents of ‘backup’ folder the only file in there is ‘OVMF_CODE.fd’. As I have no idea what these files are I tried to make a copy of this and named it ‘OVMF_VARS-1024×768.fd’ as this is the file it complaints about. In this case when I try again to boot MacOS a new QEMU window pops up with the following message:
‘Guest has not intitialized the display (yet)’
At the same time in the terminal window I can also see the following messages:
[kostas@lynx OSX-KVM]$ ./boot-macOS-NG.sh
QEMU 4.2.0 monitor – type ‘help’ for more information
(qemu) qemu-system-x86_64: warning: host doesn’t support requested feature: CPUID.01H:ECX.pcid [bit 17]
qemu-system-x86_64: warning: host doesn’t support requested feature: CPUID.01H:ECX.pcid [bit 17]
qemu-system-x86_64: warning: host doesn’t support requested feature: CPUID.01H:ECX.pcid [bit 17]
qemu-system-x86_64: warning: host doesn’t support requested feature: CPUID.01H:ECX.pcid [bit 17]
Sorry for the long and messy comment but I cannot see any formatting options to make it more readable. Any help to move forward would be very much appreciated!
I am running the latest Manjaro/Plasma KDE on a Ryzen 3900X platform.
Cheers
Hey mate!
It looks like the author changed the repo slightly.
Change the line 16 inside boot-macOS-NG.sh,
from
./backup
to
./
Here’s my file below:
MY_OPTIONS="+pcid,+ssse3,+sse4.2,+popcnt,+avx,+aes,+xsave,+xsaveopt,check"# OVMF=./firmware
OVMF="./"
qemu-system-x86_64 -enable-kvm -m 5500 -cpu Penryn,kvm=on,vendor=GenuineIntel,+invtsc,vmware-cpuid-freq=on,$MY_OPTIONS\
-machine q35 \
-smp 4,cores=4 \
-usb -device usb-kbd -device usb-tablet \
-device isa-applesmc,osk="ourhardworkbythesewordsguardedpleasedontsteal(c)AppleComputerInc" \
-drive if=pflash,format=raw,file=$OVMF/OVMF_CODE.fd \
-drive if=pflash,format=raw,file=$OVMF/OVMF_VARS-1024x768.fd \
-smbios type=2 \
-device ich9-intel-hda -device hda-duplex \
-device ich9-ahci,id=sata \
-drive id=Clover,if=none,snapshot=on,format=qcow2,file=./'Mojave/CloverNG.qcow2' \
-device ide-hd,bus=sata.2,drive=Clover \
-device ide-hd,bus=sata.3,drive=InstallMedia \
-drive id=InstallMedia,if=none,file=BaseSystem.img,format=raw \
-drive id=MacHDD,if=none,file=./mac_hdd_ng.img,format=qcow2 \
-device ide-hd,bus=sata.4,drive=MacHDD \
-netdev tap,id=net0,ifname=tap0,script=no,downscript=no -device vmxnet3,netdev=net0,id=net0,mac=52:54:00:c9:18:27 \
-monitor stdio \
-vga vmware
P.S. the second part, virsh comes with libvirt now I see: https://www.archlinux.org/packages/community/x86_64/libvirt/
I also receive the CPU error, however it does boot into clover even though there are those errors:
[cc]
QEMU 4.2.0 monitor – type ‘help’ for more information
(qemu) qemu-system-x86_64: warning: host doesn’t support requested feature: CPUID.01H:ECX.pcid [bit 17]
qemu-system-x86_64: warning: host doesn’t support requested feature: CPUID.01H:ECX.pcid [bit 17]
qemu-system-x86_64: warning: host doesn’t support requested feature: CPUID.01H:ECX.pcid [bit 17][/cc]
qemu-system-x86_64: warning: host doesn’t support requested feature: CPUID.01H:ECX.pcid [bit 17]
Well, the first part straight up doesn’t work. Either makepkg won’t work or there is stuff missing.
I have fixed the instructions, the makepkg part is for Arch Linux users. makepkg comes with pacman so it should be by default?